Monday, June 6, 2011

Paint splotch on text


1.. Open a new document and create a new layer.
2. Apply radial gradient with the color of #17505C - #000000.


3. Type a text ‘D’ and apply color of #ECBC2A.

4. Create a new layer and draw a shape of with pen tool and fill the same color of the text.

5. Apply blending option, bevel and emboss to the shape.

6. Right click the layer of the shape and select copy layer style.
7. Go to the text layer and right click, select past layer style. Same style is applied to the text as the shape.

8. Move the shape onto the text such as it looks like a part of the text.
9. Similarly create different shape on the text to make a realistic effect of paint.

Tuesday, May 31, 2011

Create realistic torn photo effect in photoshop


1. Save this image and open in photoshop.
2. Duplicate the image and change the mode to screen of the duplicated layer.
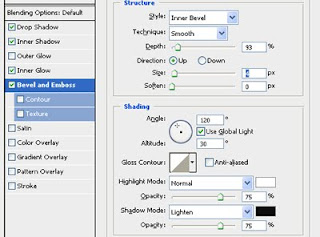
Open blending option palette and proceed the following settings.

3. Drop shadow


4. Inner Shadow

5. Inner Glow
6. Bevel and Emboss
7. Merge the two layers.
8. Save this torn paper images and open in photoshop.

9. Place a piece of torn paper from the image as shown.

10. Place another piece of torn paper from the image as shown.


11. Select the girl layer, copy and paste in a new layer or press Ctrl+J to duplicate the selected part of the image in a new layer and rotate it


12. Do the same with the other piece of paper. Add some drop shadow to the torn image to get some realistic effect to that image.

Monday, May 23, 2011

Create water droplet using layer style

1. Download a leaf image from google.

2. Open that leaf image in photoshop.

3. Create a new layer.

4. Select elliptical marquee tool and draw a circle.

5. Select gradient tool and apply default gradient color (black-white).

6. Deselect the circle.

7. Select the overlay option in layer palette.

8. Select the leaf layer and go to blending options.

9. Drop shadow

  • Select the drop shadow angle.
  • Distance for the drop shadow.

10. Inner shadow

  • Select the angle for shadow.
  • Distance and size for the shadow.

11. Create a new layer above the leaf layer.

12. Select brush tool and reduce the diameter to 7.

13. Select white as the foreground color and place a dot on the top left corner of the droplet for its realistic look.

14. Duplicate the droplet and the dot layer.

15. Select the leaf layer and go to filter > Liquify.

16. Select the brush tool and deform the circle.

17. It create an another droplet on the leaf.

Thursday, May 19, 2011

Tools in Photoshop

Move tool (V) – used for moving an artwork.

Selection tool (M)The 4 types of marquee tools are

  • Rectangular marquee
  • Elliptical marquee
  • Single row horizontal
  • Single row vertical marquee tools. Clicking Shift+M switch between these selection tools.

Lasso tool (L) Select the precise area of an mage by tracing the outline. Lasso tool includes

  • Lasso tool – free and selection tool
  • Polygonal lasso tool – select with the straight edges
  • Magnetic lasso tool – select the edges of the image

Magic wand (W)

  • Magic wand tool make selection based upon the color
  • Quick selection tool paint a election using brush tip.

Crop tool (C)- crop an image


Slice tool (K)

  • slice an image into small sections which are used for creating a website
  • slice select tool used to section of a slice in an image

Retouching tools (J)

  • Healing brush tool used to correct imperfections like blemishes, scratches, etc and make them disappear into the surrounding image. It works on the basis of source point or selection and blend the sample seamlessly.
  • Spot healing brush tool do the same work as healing brush but it does not need to define a source point or make a selection.
  • Patch tool repair a selected area with the pixel from another area or pattern.
  • Red eye tool used to repair red eye error caused due to the electronic flash.

Painting tools (B)

  • Brush tool & pencil tool paint a line with any thickness which has been specified in the option bar.
  • Color replacement tool replace specific color in the image without losing any detail of it.

Gradient & Bucket tool (G)

  • Gradient tool create a gradual blend between multiple colors
  • Paint bucket fills the adjacent colored area with the foreground color.

Blur, sharpen & smudge tool (R)

  • Blur tool smoothen the pixel, smearing them across the image.
  • Sharpen tool focus on soft edges and increase the clarity of the image
  • Smudge tool gives an effect of finger painting. It spread and mix the content of an image.

Dodge, burn & sponge tool (D)

  • Dodge tool lighten image area.
  • Burn tool darkens the image area.
  • Sponge tool saturate or desaturates the image where you paint

Pen tool (P)

  • Pen tool create straight or smooth flowing curves in path or shapes.
  • Freeform pen tool used to draw as if we draw with a pencil on paper
  • Add and delete anchor point used to add and delete an anchor point respectively from a path/ shape.
  • Convert anchor point used to convert a smooth edge on a path/shape to sharp edge and vice versa.

Type tool (T)

  • Horizontal & vertical type tool type the text horizontally/ vertically respectively.
  • Horizontal & vertical type mask tool type the text horizontally/ vertically respectively and mask an image.

Path & direct selection tool (A)

  • Path selection tool select an entire path/ shape.
  • Direct selection tool select a single anchor point/ segment in a path/ shape.

Shape tool (U)

The 6 shape tools includes

  • Rectangle tool
  • Rounded rectangle tool
  • Ellipse tool
  • Polygon tool
  • Line tool
  • Custom tool

Notes & audio annotation tool (N)

  • Notes tool attach your notes to the image.
  • Audio annotation tool attach voice notes to the image.

Eye dropper & color sampler tool (I)

  • Eye dropper tool samples color from a picture to a new foreground and background color
  • Color sampler tool shows the color value of defined spots in an image. 4 color values are seen in a single sampler.
  • Ruler tool measure the distance between 2 points in an image.
  • Count tool count the objects in an image.

Zoom tool (Z) magnify the document


Hand tool (H) used to navigate over the image

Monday, May 16, 2011

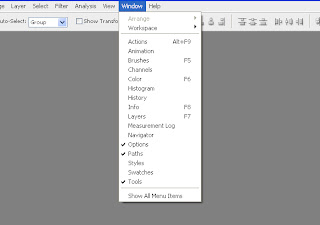
Window


Arrange – arrange multiple documents opened in photoshop

  • Window > Arrange >
    • Cascade – arrange the windows as stack and cascade from top left to bottom right of the screen
    • Tile vertically/ horizontally – arrange windows vertically/ horizontally with edge to edge
    • Match zoom and location – all windows opened in the software get zoomed to the same percentage.

Action is a set of commands when applied to an artwork is recorded and can be used again to save the time and keystrokes.

  • Window > Action (Ctrl+F9)
  • Action palette includes record and stop button.
  • Create a new document with an image.
  • Open action palette and start recording.
  • Resize the image and apply filter effects on the image and stop the recording.
  • This action can be applied on any image by clicking the play button in action palette.

Animation – show/ hide animation palette. It used to create gif animation in photoshop.

Brushes – show/ hide brushes palette (F5).

Color - show/ hide color palette.

Histogram – show/ hide histogram palette which show the graph of tonal range(RGB) of an image.

History – show/ hide history palette which help in viewing the value of rgb at the point where we move the cursor.

Layers – show/hide layer palette (F7)

Measurement log – show the records of measurement taken in the document.

Navigator – show/hide navigator palette which help in changing the view quickly.

Option bar – it show the option available for the particular tool which has been currently selected. It appears below at the top of the screen below the menu bar.